In this lab, we will get familiar with the lab computers and use the Windows operating system. The lab will be presented by the TA step-by-step. However, you are free to work at your own pace on the lab.
You will see a login screen when you first sit down at the computer. (If you do not, check to see if the computer is on. Press the power on button and wait for the system to start.) To login, you will need your Novell account user id and password. These are initially your student id and your date of birth (MMDDYY). Your TA does not know your user id/password. Type in your user id and password and click to login.
TASK: Login to the system using your Novell user id and password.
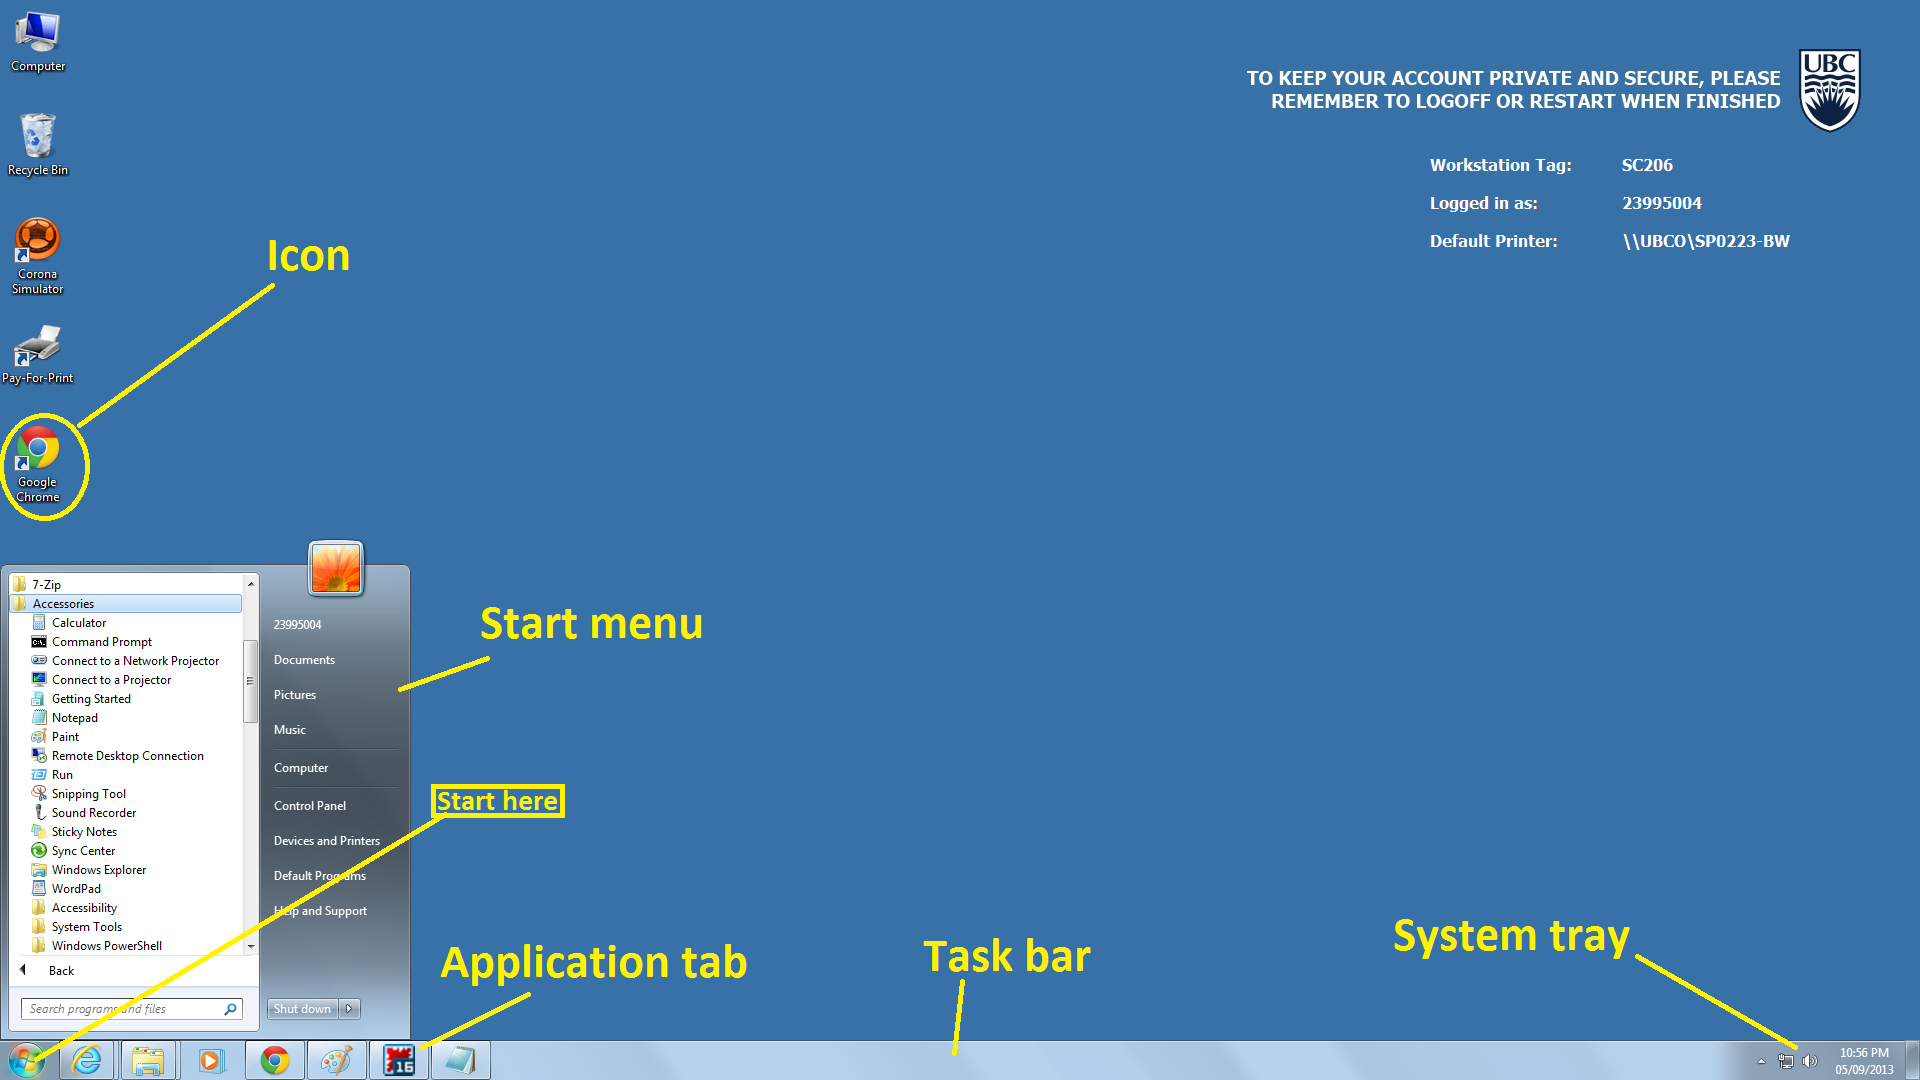
After you are logged in, you see the desktop. The desktop consists of many components. The background is an image that you can change. On the desktop are icons that are shortcuts to either programs, files, or folders. On the bottom is a task bar that contains a Windows Start button, buttons to open applications, a clock and a system tray. Icons are opened by double-clicking on them with the left mouse button. You can go to an open window by clicking on its button in the task bar or cycling through open programs using Alt+Tab. If you let your mouse sit (hover) over an icon or button, a pop-up description may appear.
TASK: Explore the Windows desktop.
The Start Menu contains links to programs on the computer. Instead of having to find them on the hard drive, a link to the program is provided on the Start Menu for you to click to start the program.
TASK: Open up Internet Explorer using the Start Menu. Open the course website http://people.ok.ubc.ca/abdalmoh/teaching/122/index.html.
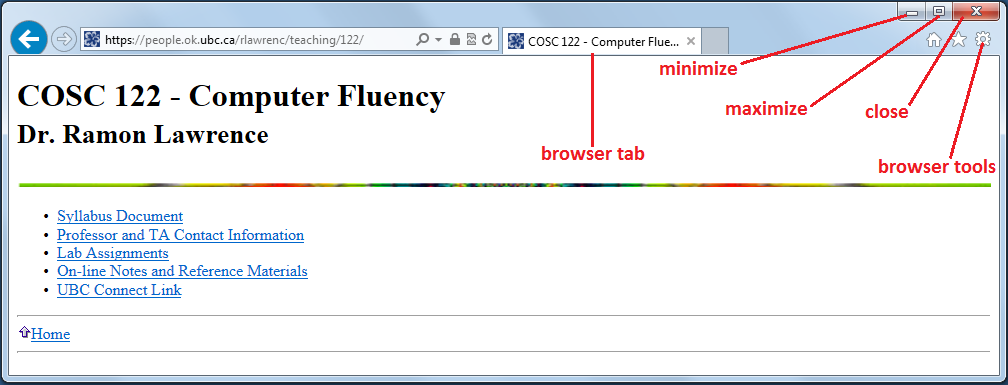
You can move, resize, minimize, maximize, and close windows. The buttons to minimize, maximize, and close are in the top-right hand corner of the window. You can resize a window by click-and-hold the left mouse button over the bottom-right hand corner of the window border (the cursor should change to a double-ended arrow) and dragging the window to be the desired size. A window can be moved by click-and-hold the left mouse button on the top window bar and dragging it to its required location. If a window cannot be resized, these buttons may be greyed out. If resizing a window makes the window too small to show all information in it, horizontal or vertical scrollbars may appear to scroll through the non-visible information.
TASK: Minimize, resize, then close the Internet Explorer window opened in Step #3.
An application is a software program that performs a task. Two applications that come with Microsoft Windows are a calculator and WordPad. These applications are in the Start Menu, under All Programs, then Accessories.
TASK 1: Open up the calculator and compute 765 * 341 - 10.
TASK 2: Open up WordPad. Create a document that looks like the document below and save with the name HelloWorld.rtf.
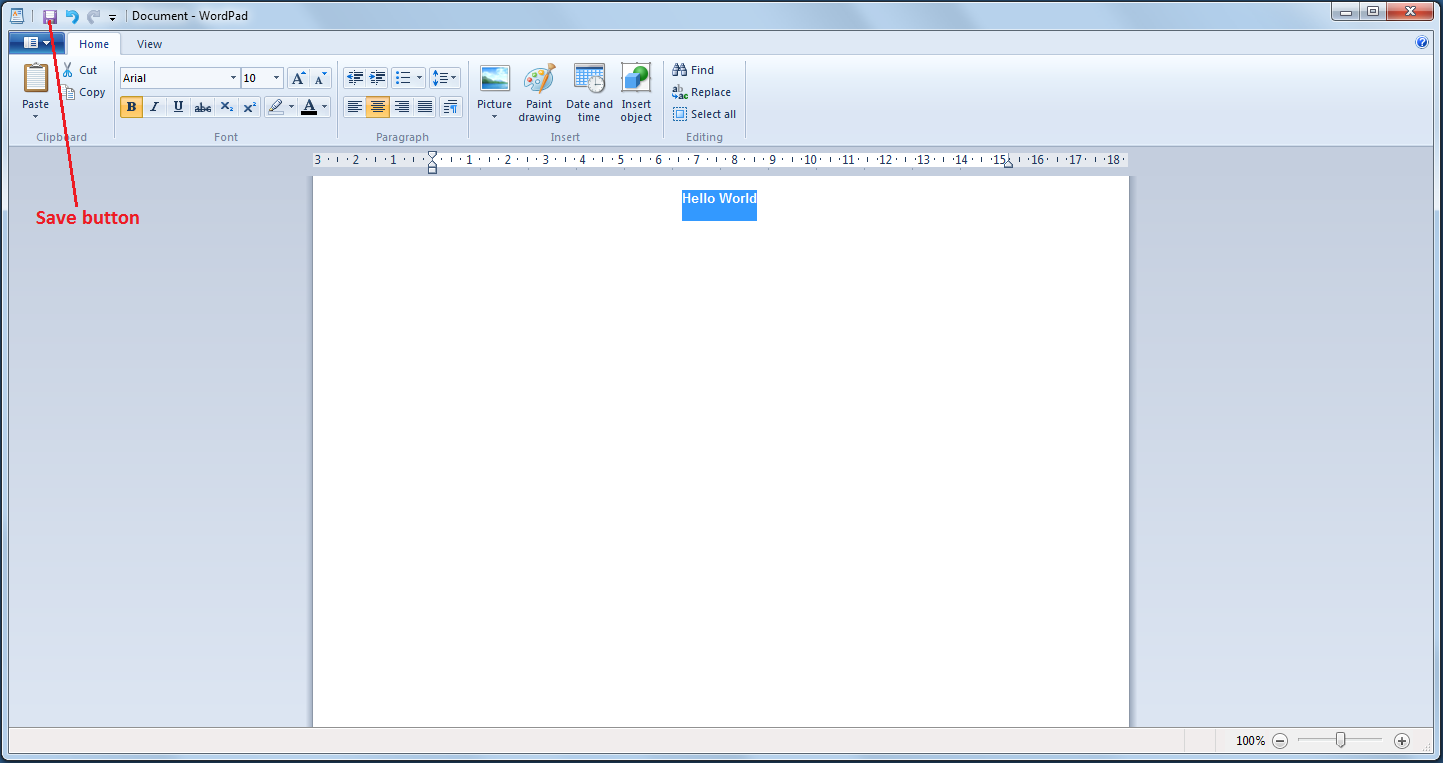
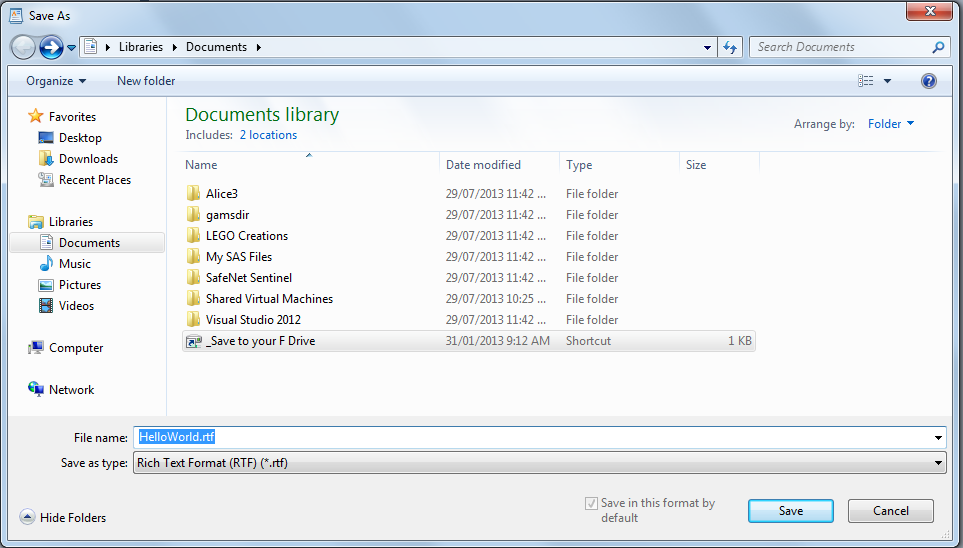
To save a document, click on the purple floppy disk image in the top window bar. You will be asked for a file location. Save it on your F: drive which should appear by default as My Documents.
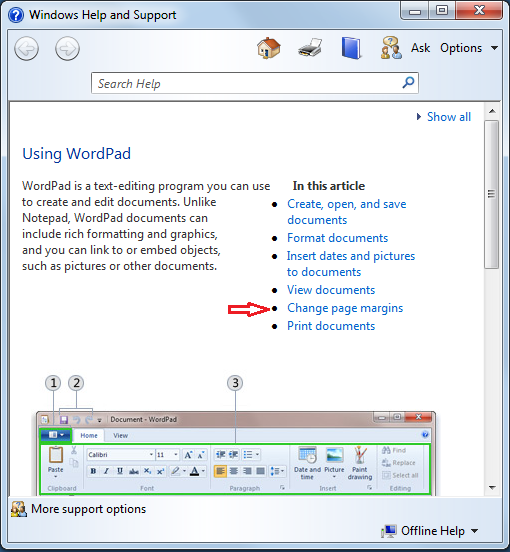
Most applications have some online help that can be accessed using the Help menu. Below is the help provided with WordPad.
TASK: Find the Help menu in WordPad and look up how to change page margin sizes.
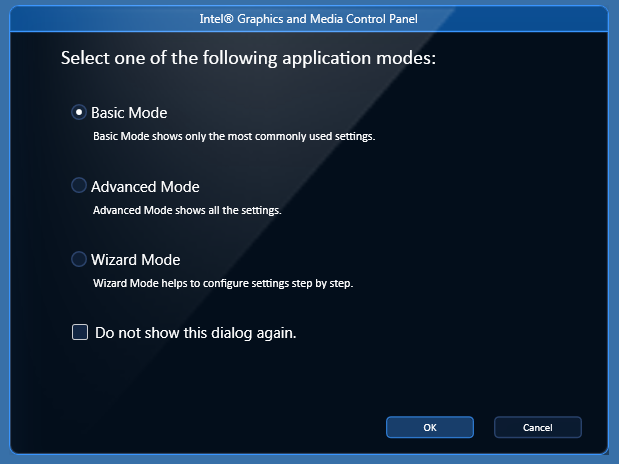
The appearance of the desktop and screen saver can be changed by doing a right-click on the desktop background (not on top of any icons or windows). The pop-up menu that appears has the option Graphics Properties. Enter the Basic Mode of the media control panel. This will open up a window with several graphics properties you can adjust.
TASK: Open up the Graphics Properties. Change resolution to 1024 x 768. Then change it back.
Windows Explorer (not Internet Explorer) is a graphical interface for the management of your files and folders on your computer. To open a Windows Explorer window, click on the icon in the task bar that looks like a folder. If you happen to have multiple explorer windows open already, hovering over this folder will show them to you:

If you do not currently have any Windows Explorer windows open, clicking on the folder icon will open a new window for you to navigate through your computer. If you have existing Explorer windows open, you may open a new Explorer window by right-clicking the folder icon and choosing Windows Explorer.
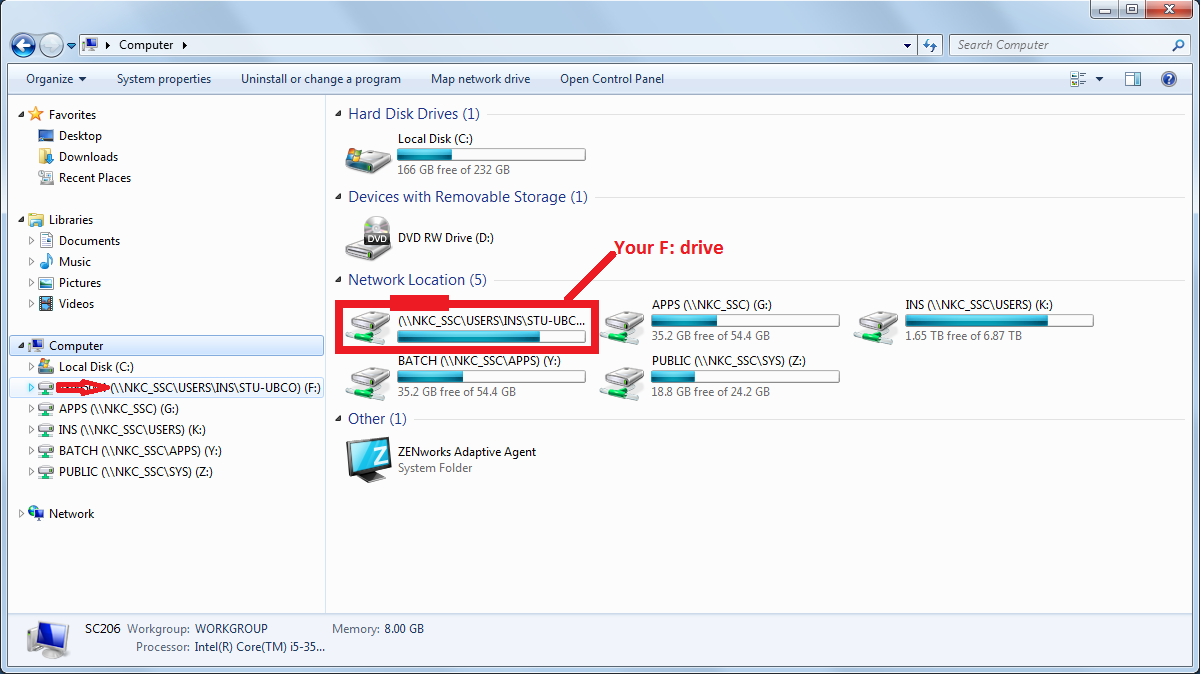
On the left side pane (part of the window) are devices and folders. On the right side pane are the contents of the current folder or device that you selected on the left hand side. The folders or devices may be physical (actually exist) or logical (virtual). The C: drive is the common name provided for the default hard drive in your computer. A: is used for a floppy, and letters like D: or E: are used for CD/DVD drives, although this depends on your machine.
At the university, you also have access to your own virtual, network drive called F:. It is a network drive because the information is not stored on the computer you are currently using, but on some other computer in the network. Your network drive is useful because the data stored on it will not be lost and can be accessed from any machine on campus (or even from your home). We will use the network drive for storing our assignments. Also, your network drive is private and protected. Only you can see and access its contents.
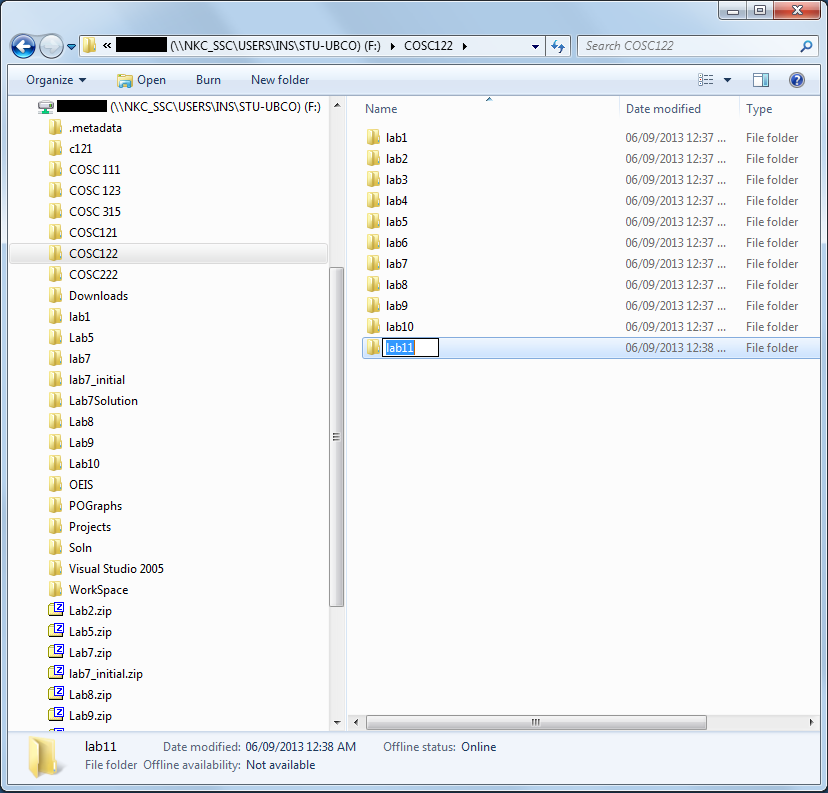
You can use Windows Explorer to create files and folders. To create a folder, click on a folder on the left-hand side where you want to put this new folder. For us, this will be F:. Find your F: drive under the Computer heading on the left pane of the Explorer window. Either using the New Folder button from the top menu or right-click and selecting New then Folder from the pop-up menu, you will get a folder. The folder initially has no name, but you can fill in the name right away. If for some reason you are not able to fill in the name, right-click on the new folder and select Rename from the pop-up menu.
TASK: Create a folder called COSC122 on F:.

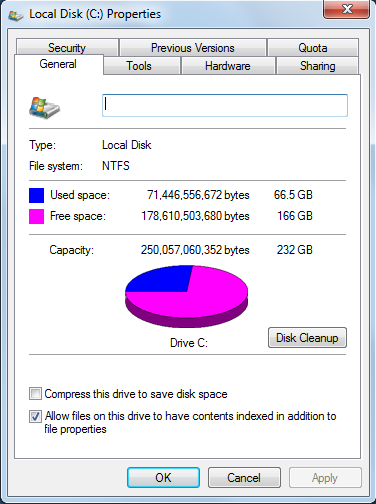
You can find the device capacity or folder size by right-clicking on it and selecting Properties. For devices, this will tell you how much space is used and remaining on that device. For folders, it will tell you the number and size of files in the folder.
TASK: Determine the used and free space in GB for the C: drive.
Files can be manipulated in Windows Explorer by right-clicking on them and selecting the appropriate menu item: Rename, Delete, Cut, Copy, or Paste. These operations can be done by highlighing the file (by left-clicking on it once) and then right-clicking to get the pop-up menu. A quick way to create the multiple folders we will require is to select folder lab1, perform Copy operation (can even use shortcut Ctrl+C), and then perform Paste operation multiple times (can use shortcut Ctrl+V). Then rename the copies correctly.
TASK: Create a folder called lab1 under COSC122 folder. Then copy the lab1 folder 10 times. Rename the new folders lab2, lab3, ..., lab11.
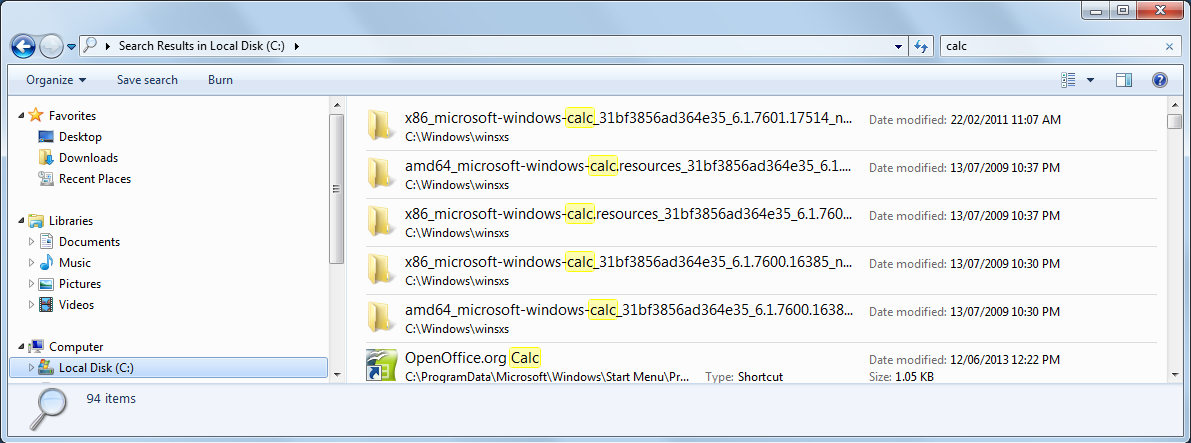
To find the location of a file on your computer, you can use the Search.. operation of Windows Explorer. (This operation can be found in the top-right of an Explorer window.) Type in the name or part of the name of the file you are looking for. You may also find files by date or other properties. Here we are searching for the file that contains the calculator program. Since we do not exactly know its name, we will search for calc which says match anything which contains the characters calc in the name. It turns out there are a lot of files that contain those characters. The one with the actual program is calc.exe. (The others are unrelated or are shortcut files to the actual program calc.exe.) A path is a location of a file on a computer. It consists of the file name and all the directories/subdirectories that must be traversed to get to the file. As an example, the path to the calc.exe program shown in the figure below is C:\Windows\System32\calc.exe.
TASK: Perform your own search for the file wordpad.exe (WordPad program) and put the path to the file in a WordPad document called solution.rtf and save in the folder COSC122/lab1. (Hint: it is in the C:\Program Files\ folder)
Tools that perform compression (often called zip) shrink the size of files using compression algorithms. A program that performs compression is built-into Windows. You use compression to combine multiple folders and files into a single file for submission. This is how we would zip up the directory 122 that we created in a previous step.

A web page is a document that contains mark-up that allows it to be displayed graphically by a web browser. The page may also contain hyperlinks to link to related web pages. A web server is a computer on the Internet with the task of storing web pages and responding to clients� requests for them. The World Wide Web (WWW) is the web servers and the files they store. There are many different software programs that perform the function of web browsing.
| Operation | Description |
|---|---|
| Open/Get Page | Retrieve and display a web page from a web server. Performed by either typing address into address bar, using history/favorites, or clicking on hyperlink in current document. |
| Back | Go back to the previous page in the history list. |
| Forward | Go forward to the next page in the history list (only available if viewing a previous page in the history list) |
| Stop | Stop the current web page transfer/download |
| Bookmark | Explicitly save the web address of this page for later. |
| Submit Form | Fill-in data fields and submit FORM data to a server. |
| Search | Search the web for content using keywords. |
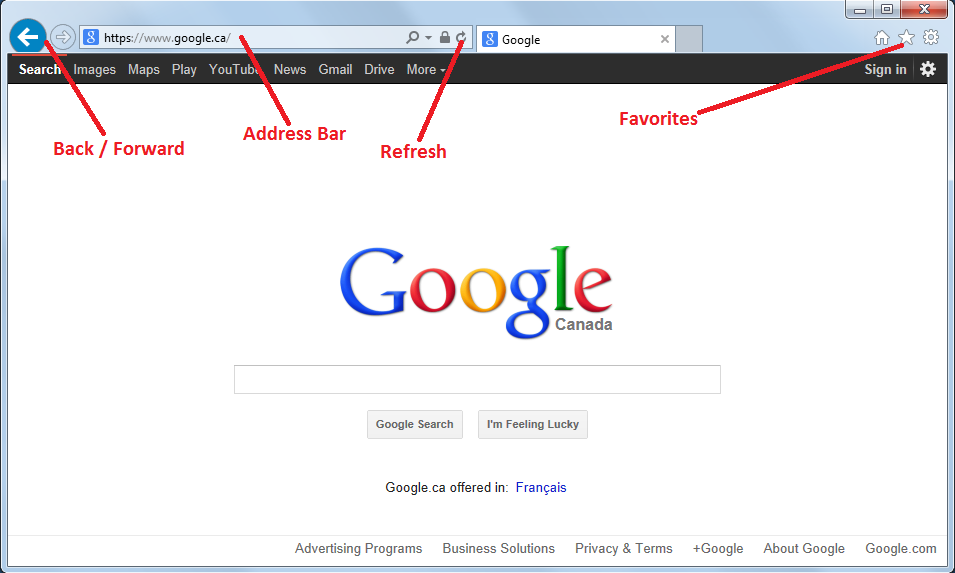
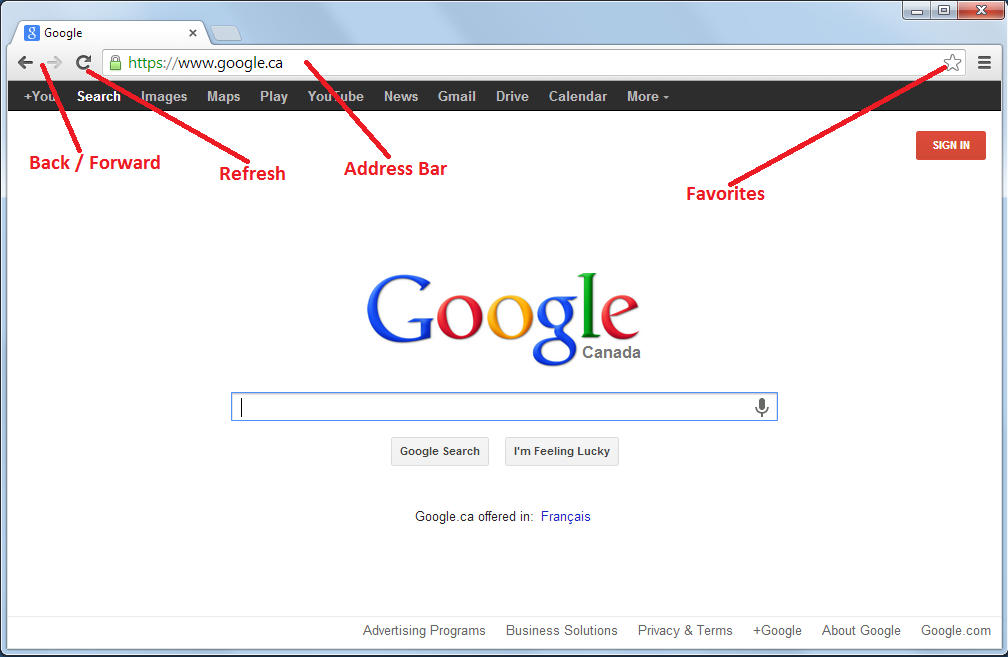
Below are screenshots of Microsoft Internet Explorer (IE) and Google Chrome where you can see the user interface components allowing you to perform these common operations.
TASK: Use IE, Firefox, or Chrome. Open and browse the page www.yahoo.com. Find a current stock quote for IBM.
Web searching is the process of finding content on the Internet. There is no master directory of all the content on the Internet, so we use search engines to help us find the web sites with the content we need. Common search engines include Google and Bing. Search engines work by allowing us to enter keywords that describe the content we are looking for, and then searching their database to find web sites that have those keywords. The search engine provides us a list of possible web sites which we then browse to (hopefully) find the content we require.
TASK: Using the search feature of yahoo.com (or another search engine), find the age of Sir John A. Macdonald when he died.
Browsing normally means retrieving and reading web content. However, users can interact with web servers by filling in forms and sending that data to the web server. This is required in order to communicate data to the server for making purchases, logging in, and a variety of other uses.
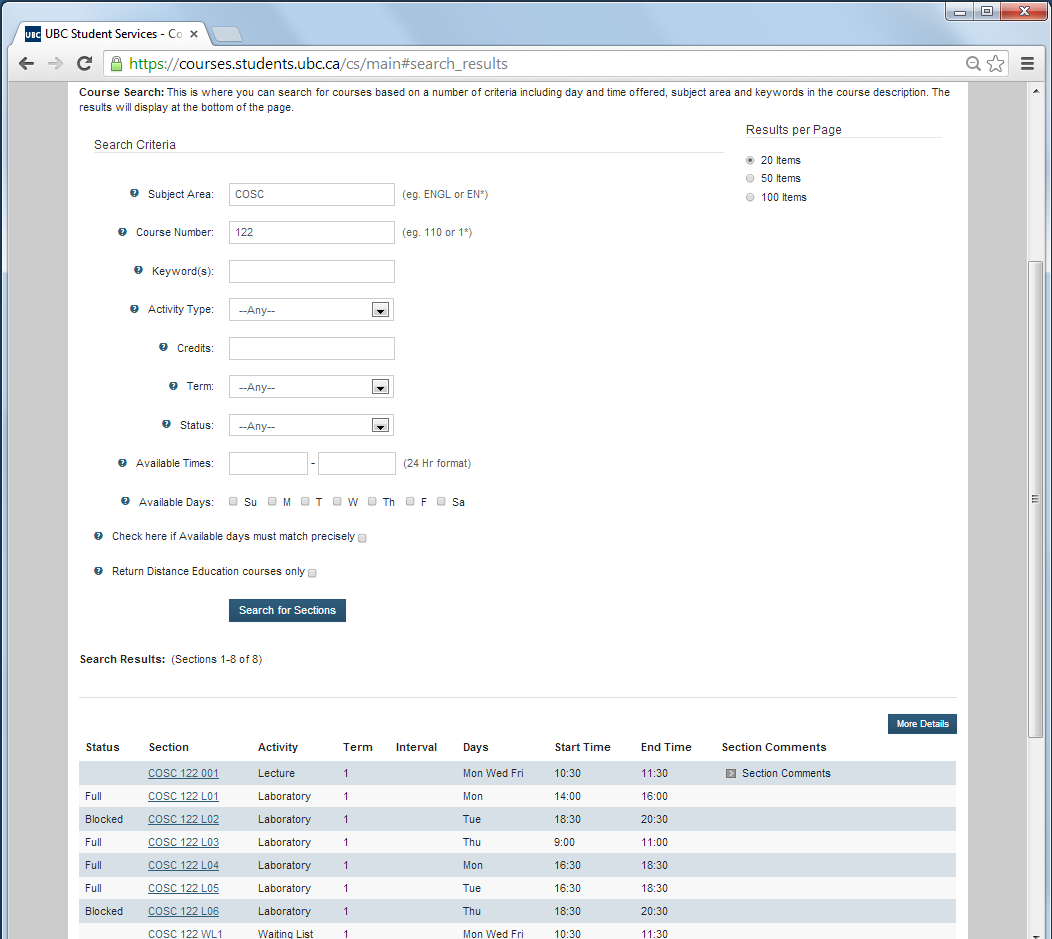
Below is a screenshot showing a search form to find courses at UBC Okanagan. The user has already clicked the Search for Sections (SUBMIT) button and sees some results.
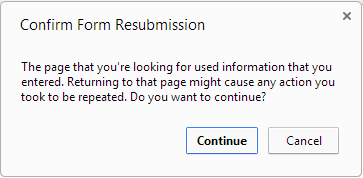
If you click the browser Refresh button, this message appears:
Google Chrome
Microsoft Internet Explorer
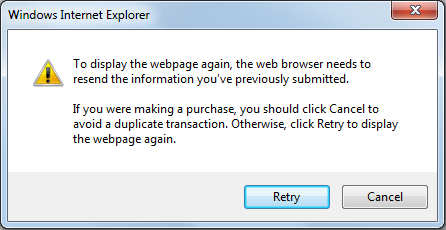
If you click Cancel in Firefox nothing happens, in Internet Explorer you will see this:
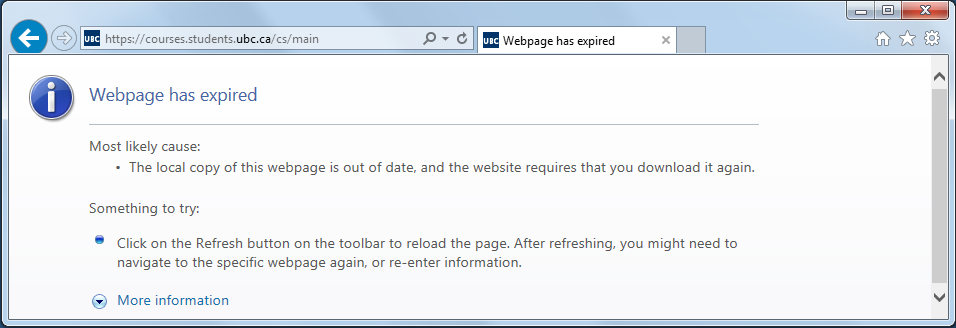
What is happening? Well, some web pages are created dynamically from input that you provide to the web server (such as with the search form we just filled out). In order to re-create this page for you (when you asked to refresh), you needed to re-send this data to the server. If you do not, the page cannot be displayed. Clicking refresh and resending the information will allow the page to be displayed.
TASK: Search for COSC courses that start with the number 2 this semester (e.g. 211).
Web pages are written in HyperText Markup Language (HTML). For any web page in your browser, you can view its source code. This is useful when you will develop your own pages both to see your code and to see code from other sites that you may want to use. In IE, view source by right-clicking the webpage (careful not to right-click on an image or a link) and select View source. In Chrome, use the right-click and select View page source. A screenshot of Internet Explorer's view source code is below.
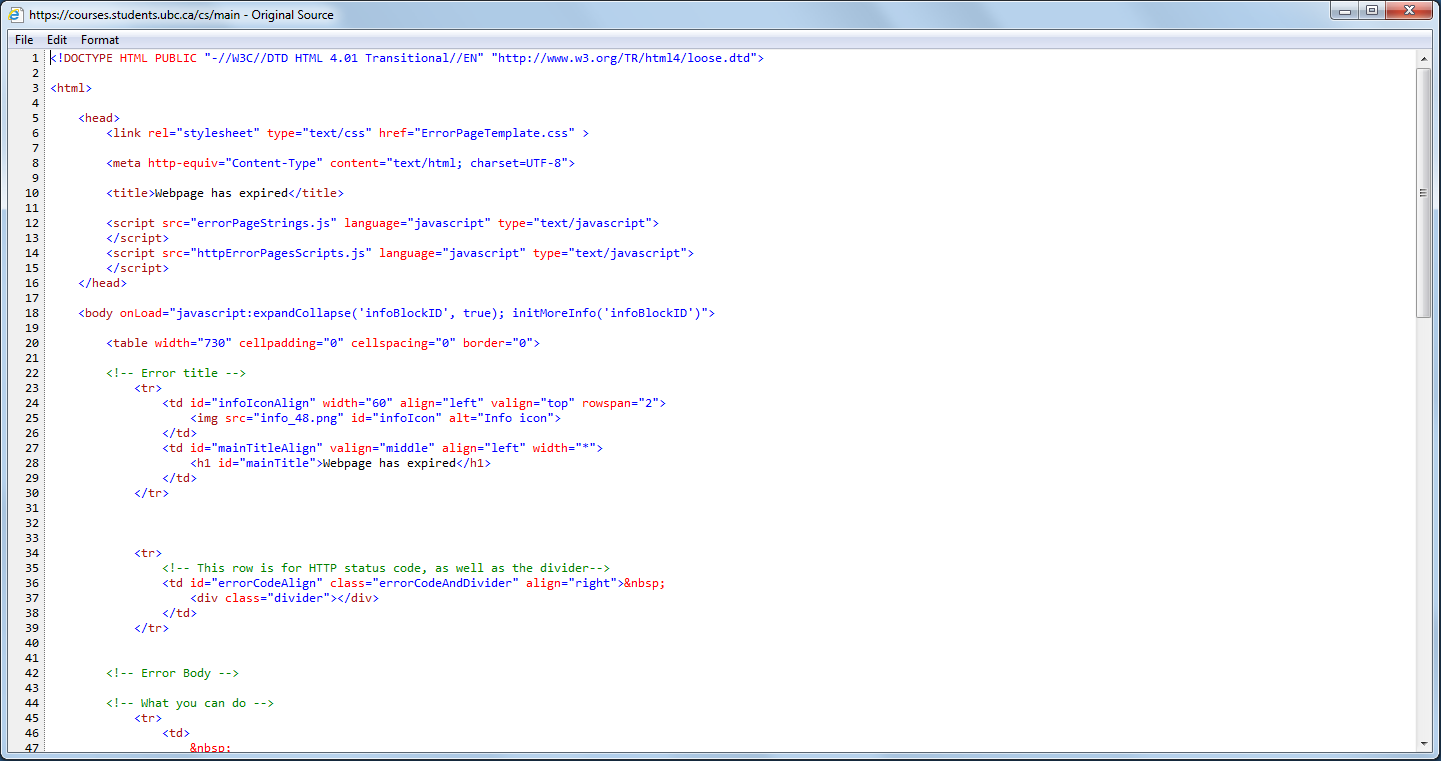
TASK: View source code for the page http://www.google.ca
You can change numerous options about your Internet browsing experience. Two common things to change is your startup (home) page and to clear your browser cache. Clearing your cache removes all web pages that were stored on your machine. The cache makes browsing faster as the copy is shown to you (if possible) rather than retrieving it from the web site.
TASK: In IE or Chrome, change your startup page to www.yahoo.com and clear the cache. Open a new browser window.
Email is an application on the Internet that allows you to transfer electronic messages between users. To use email, you need an email account. An email account provides you with a unique email address and a server that stores and forwards messages on your behalf. There are many free email services on the web where you can register for an email account (Hotmail, Gmail, etc.).
| Operation | Description |
|---|---|
| Send | Send an e-mail to one or more people (email addresses). |
| Receive | Retrieve email messages from the server. |
| Read | Read an email message |
| Compose/Reply | Create a new email message or reply to an existing one. |
| Forward | Forward (re-direct) an email message to another person. |
| Component | Required? | Description |
|---|---|---|
| Subject Line | Yes | One line description of email contents. Required but may be empty. |
| To | Yes | Email address(es) that message should be sent to. |
| From | Yes | Email address of person sending email. |
| CC | No | Email address(es) that should also be sent the message (Carbon Copy). |
| Bcc | No | Blind Carbon Copy - Email address(es) to also send message, but any addresses in this line will not be visible to receivers. |
| Text Body | Yes | The text body contains the message of the email. It can be empty, but always exists. |
| Attachment | No | Attachments are files that are sent along with the text email (such as pictures, documents, etc.). |
TASK: Using your email. Send a file to yourself with a picture as an attachment.
For this lab assignment, submit using Canvas: